👩🎓ExamSimulator: How to set an exam
Once you have built your exam, here is how to set it for one or more of your groups.
Why do we need to do this?
Setting an exam is how you allow your students to access the exam and to be able to complete it.
What comes before?
You (or someone in your department) must have built at least one exam or you must be using one of The EverLearner's pre-made exam templates (Centralised Exam Templates).
Setting the exam assignment:
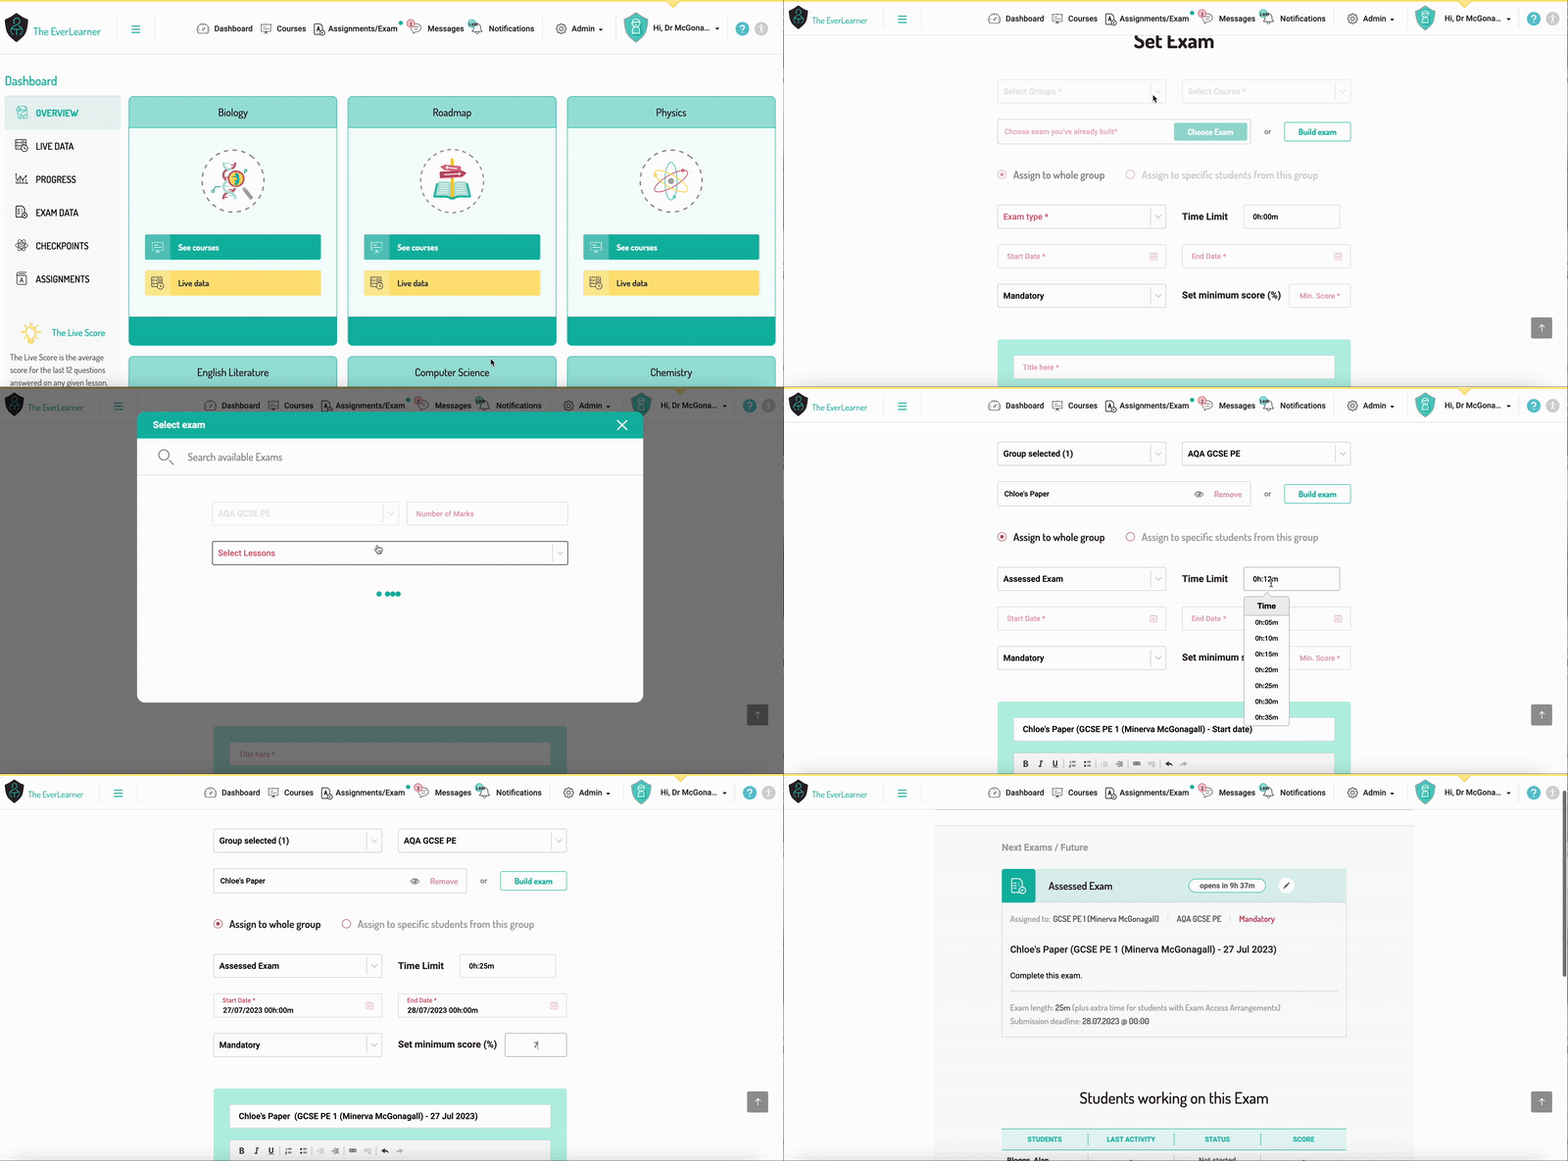
- Login to your account and click on the 'Assignments/Exam' button at the top of your page.
- Click on the 'Exams' tab.
- Click on 'Set exam'.
- Select the group or groups you are going to set the exam to. Remember that you will only be able to set the exam to groups you teach. If the exam needs to be set to groups you don't teach, the teacher for that group will need to set the exam to that group. Remember that any teacher in your department will have access to any exams that have been created within the department. So, to set the exam, they simply need to find the exam and complete the process for their group.
- Select the course this exam is written for. If the course drop-down is unavailable, this could be because you have chosen more than one group with different courses or there are no ExamSimulator questions available for the course you have selected.
- Click on 'Choose exam' and select the exam you want to set. If you have not previously built the exam, you can click on 'Build Exam' and then come back here to set it.
- Choose whether you want to assign the exam to all students in the group(s) you have selected or if you only want to assign it to some students.
- Choose the 'exam type'. The options are:
Practice: There is no set 'time limit' for the exam paper itself. The exam is accessible from the moment the assignment window opens to the moment it closes. The student can access the exam as many times and for as long as they wish. The exam will auto-submit at the end of the assignment window. The teacher can only mark the exam once the assignment window is closed.
Assessed: The exam is available to the students to start at any time during the assignment window up until shortly before the end of the assignment (depending on the exam length). However, once the student has started the exam, the timer for the exam starts to count down and, whilst the student can come out of the exam at any time, they will have to complete it before the timer runs out. The exam will 'auto-submit' at the end of the exam time. Any exams which have not submitted by the end of the assignment window will submit automatically. The teacher can mark the exam once all the exams have submitted. If every student submits early, then you will be able to mark early.
Printable: A printable exam allows you to set a paper for the students to complete at their desk on paper. There is no assignment window - you are free to set students the exam whenever you like.
Be aware that the exam will automatically move to 'Not Marked' once it's created.
Once the exam is set, you can print it manually from the assignment. Once the students have completed the exam, you can mark it using the mark scheme which is available from the assignment and you can enter the marks directly into the platform once the marking is complete. - For Practice and Assessed exams, you should now be able to set the required time limit for the exam. By default, this time is pre-populated with the time allowed for all the questions contained in the exam. You can choose to allow more or less time, although it is not advisable to allow less time. For practice exams, this time limit is only advisory the student will not be timed or given an indication whether they are over the limit.
- Choose Start date and time. This is the earliest time when students will be able to access the exam and will be able to start completing it.
- Choose End date and time. This is the point at which the exam will close. Any students who are still completing their exam when the assignment reaches its deadline will see the exam close and their exam will automatically be submitted.
When setting start and end times, it is important to consider that you will not be able to set a shorter exam than the maximum exam length for the class, taking into account students with additional time. - Choose whether you want to make the exam mandatory or non-mandatory.
- Set the pass rate. The pass rate will only affect the message students receive at the end and the colour of their score (green or red).
- Give the exam a unique name, enter the instructions and click on 'Set exam'.
- At that point, the exam is set. All the students who have been set the exam will now be able to see it on their exam list. They will not be able to access the exam itself though until the exam opens.

%20Square%20(1).png?width=190&height=189&name=Logo%20Solid%20(Green%20on%20Violet)%20Square%20(1).png)